


Surgical instrument laser marking has become a critical process step for hospitals and manufacturers that need durable identification, efficient inventory control, and full traceability. Instead of labels or inks that fade, peel, or fail under harsh cleaning, deep 0.1 mm marks created by fiber lasers remain readable after thousands of reprocessing cycles. For a manufacturer like GuangYao Laser, which focuses on high‑quality solutions for medical customers, mastering deep surgical instrument laser marking with stable depth and contrast is key to helping clients meet regulatory, logistical, and performance requirements.
Below, we walk through the complete process: how the 0.1 mm mark is created, which parameters need to be controlled, how marks interact with sterilization and disinfection, and what kind of equipment setups are most suitable for modern medical manufacturing lines.
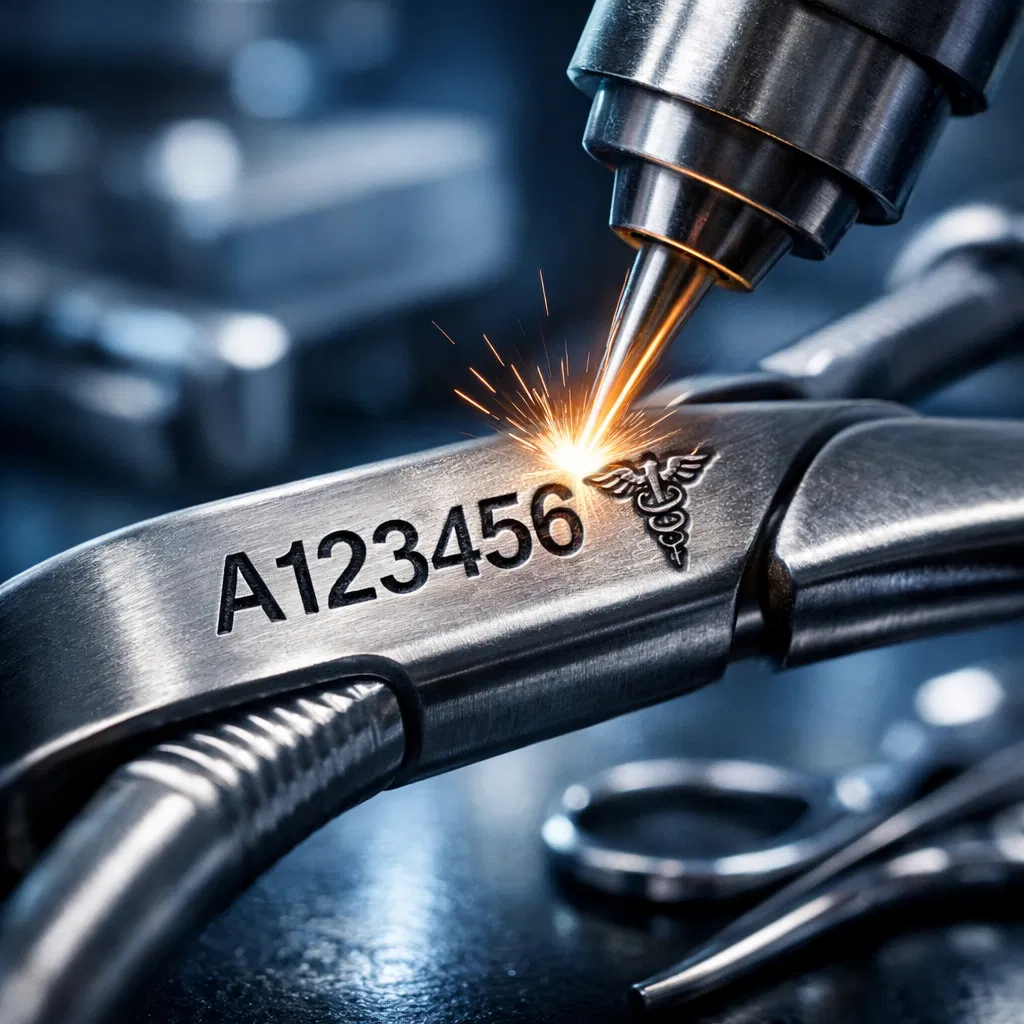
Process Engineering: How to Achieve Clean, Deep 0.1 mm Marks on Stainless Steel
The core of deep 0.1 mm surgical instrument laser marking is controlled material removal on medical‑grade stainless steels such as 1.4021, 1.4034, or 1.4116, which are commonly used in scissors, clamps, and various surgical tools. Fiber laser stainless steel marking uses a tightly focused beam to ablate or melt a thin layer of metal in successive passes, gradually forming a well‑defined groove with the desired depth.
For many production environments, a typical configuration is a pulsed fiber laser in the 20–50 W range, operating at near‑infrared wavelengths around 1064 nm. In deep marking applications, rather than trying to reach 0.1 mm in a single pass, the process is often divided into multiple layers. Each layer might remove only a few microns of material, but with carefully selected scan speed, pulse frequency, and line spacing, the final result is a sharp, legible engraving. This layered approach reduces burr formation and minimizes the risk of micro‑cracks at the edges of the engraved region.
Surface preparation plays a major role in the consistency of the process. Surgical instrument laser marking performs best on clean, degreased surfaces, with no residual polishing pastes, oils, or passivation films. In many medical factories, instruments are washed and dried before being loaded into the marking workstation. This ensures the laser energy interacts directly with bare metal, giving uniform ablation and predictable depth growth from pass to pass. For instruments with mirror‑polished areas, a slight pre‑roughening or matte finish can be introduced where the mark will be placed, to improve readability without affecting the functional area.
Another aspect of the process is character design. Deep 0.1 mm marks are often used for alphanumeric IDs, logos, or simple codes that need to remain legible after wear. Font choice, stroke width, and character height must be optimized for both readability and cycle time. Taller characters with sufficiently wide strokes are easier to engrave deeply without losing definition; extremely thin strokes at 0.1 mm depth risk collapsing or merging after multiple cleaning cycles or mechanical contact. In practice, many manufacturers adopt minimum character heights in the range of 1–2 mm for deep IDs on reusable instruments, striking a balance between legibility and available space.
Precision Control: Balancing Power, Speed, and Focus for 0.1 mm Depth
Reaching and holding a reliable 0.1 mm depth requires precise control over three main elements: laser power, scanning speed, and focus position. In fiber laser stainless steel marking, these parameters determine how much energy reaches the surface and how efficiently the metal is removed.
Power and pulse energy define how aggressively each pass removes material. If the average power or pulse energy is too low, many passes will be needed, slowing down the line. If power is too high, the molten pool can become unstable, leading to spatter, rough sidewalls, or a heat‑affected zone that extends beyond the desired boundary. A practical approach is to start with moderate power levels and gradually increase them while monitoring both depth and mark quality, then lock in a “window” where each additional pass removes a predictable amount of material.
Scan speed and hatch spacing also influence depth and surface appearance. Slower scan speeds concentrate energy, increasing removal per pass, while tighter line spacing ensures uniform material removal across strokes. However, overly slow speeds or overly dense hatches can overheat the surface, causing discoloration and potential distortion. Process engineers often build a parameter matrix that correlates power, speed, and number of passes with measured depth on a representative batch of instrument steel, then select a combination that reaches 0.1 mm with good edge quality and acceptable cycle time.
Focus control is critical, especially with curved or angled instrument surfaces. The focal point must remain inside or near the top of the material as passes deepen the groove; otherwise, the beam waist will drift above the surface and energy density will drop, slowing the removal rate. Autofocus systems or programmable z‑axes are widely used to maintain optimal focus, either by stepping focus downward after a certain number of passes or by using sensors to track the surface. For instruments with complex shapes, custom fixtures are designed to hold the marking area at a consistent distance and angle relative to the lens.
To confirm that the process truly achieves 0.1 mm depth in production, manufacturers rely on measurement tools such as optical profilometers, contact stylus gauges, or high‑resolution microscopes with depth calibration. Depth checks are typically performed on first article samples and then periodically during production runs, ensuring that the surgical instrument laser marking process remains within tolerance across shifts and batches.
Sterilization Compatibility: Ensuring Deep Marks Survive Cleaning and Reprocessing
A deep 0.1 mm mark is only valuable if it remains readable and clean after repeated hospital use. Surgical instrument laser marking must therefore be compatible with both chemical cleaning and sterilization cycles such as steam autoclave, low‑temperature hydrogen peroxide plasma, or ethylene oxide. Deep engravings have the advantage of mechanical robustness: even if the surface experiences slight wear, the code or text remains visible because it is cut into the metal, not just on the surface.
However, deep marks must be designed so they do not become traps for soil or biofilm. Groove geometry matters: steep, sharp edges or undercuts are more difficult to clean than smooth, open profiles. A well‑engineered 0.1 mm engraving on stainless steel will have clean, slightly rounded edges and a base that can be accessed by cleaning fluids and brushes. After laser marking, many manufacturers include a passivation step to restore corrosion resistance on the exposed surfaces and remove any free iron that might have been introduced during marking.
Validation testing usually involves exposing marked instruments to a defined number of cleaning and sterilization cycles and then evaluating them for legibility, corrosion, and residue retention. Test protocols can include visual inspection under magnification, corrosion tests in simulated body fluids or cleaning solutions, and, in some cases, microbiological assessments to confirm that the engraved regions can be adequately disinfected. In practice, deep 0.1 mm surgical instrument laser marking on medical stainless steel can be qualified to withstand dozens or hundreds of full reprocessing cycles without losing readability when the process is correctly tuned and post‑treatment is properly applied.
From a regulatory and customer perspective, this endurance supports traceability and asset management. Hospitals can track instruments over time, correlate them with sterilization cycles, and make repair or replacement decisions based on actual usage rather than guesswork. For manufacturers, providing validated information about how deep marks behave under standard cleaning and sterilization processes adds confidence for purchasing teams and clinical engineers.
Workflow Compatibility: Marking Without Compromising Function or Ergonomics
Deep 0.1 mm engraving must coexist with the functional and ergonomic requirements of surgical instruments. Cutting edges, articulation joints, and gripping surfaces often cannot be disturbed or weakened. That means the location of surgical instrument laser marking must be carefully chosen so that the engraved area does not interact with tissue, does not enter sealing surfaces, and does not compromise mechanical strength.
In practice, many instrument designs reserve “marking zones” on the shanks, handles, or non‑critical surfaces. During design for manufacturing, these zones are planned with enough flat area to host alphanumeric text and, where needed, a small two-dimensional code. The deep 0.1 mm mark can then be placed where it is easy to read, yet shielded from the most aggressive contact surfaces in daily use. For instruments with very limited free space, engineers may use abbreviated IDs or smaller fonts while still maintaining minimum stroke thickness for readability.
Production workflows must be designed so that marking integrates smoothly with other operations. That includes fixturing for repeatable placement, clear orientation indicators for operators, and, where necessary, integration with vision systems that verify part type and position before marking. For manufacturers handling large instrument sets, batch marking strategies are common: multiple instruments are loaded into a fixture, and the fiber laser stainless steel marking system engraves each part in sequence with the correct text or IDs pulled from a database.
Recommended System Configurations for Deep Surgical Instrument Marking
For manufacturers looking to implement or upgrade deep 0.1 mm surgical instrument laser marking, several system characteristics are especially important:
- Laser source and power range
A pulsed fiber laser in the 20–50 W range offers a good balance between marking speed and fine control on stainless steel. Higher power can reduce cycle times for large or dense marks, but fine tuning is more critical to avoid excessive heat input. The source should have stable output over long production runs to keep depth repeatability high. - Optics and lens selection
Shorter focal length lenses provide smaller spot sizes and higher energy density, which are useful for detailed deep marks in tight spaces. However, they also reduce the marking field size and depth of focus. A typical setup might include one lens optimized for small, detailed marks and another for larger text on instrument trays or bigger components. - Motion system and fixtures
A stable, precise motion stage ensures that multiple passes overlap correctly, producing clean 0.1 mm engraving. Rotary axes and custom fixtures are often needed to hold curved or angled instrument surfaces within the correct focal range. Quick‑change fixtures help maintain throughput when switching between instrument families. - Process control software
Software should support layered parameter sets, allowing different passes with different power or speed values in a single job. This is useful when a first set of passes is dedicated to bulk material removal and a final pass is reserved for edge smoothing or contrast adjustment. Integration with part databases and serial number generators helps keep IDs unique and traceable. - Inspection and quality assurance tools
Including a simple depth measurement routine in the quality plan is essential. Optical or contact measurement tools can be used on sample parts to verify that 0.1 mm depth is consistently achieved. Visual inspection criteria for edge quality, burr formation, and contrast should also be documented and checked regularly.
By combining these elements, GuangYao Laser can help medical manufacturers deploy surgical instrument laser marking processes that deliver reliable, deep 0.1 mm identification without compromising performance, cleanliness, or ergonomics. Deep fiber laser stainless steel marking, when properly engineered and validated, becomes a powerful tool for hospitals and manufacturers who want lifetime identification, modern tracking, and a robust foundation for digital instrument management.
Table of Contents
- Process Engineering: How to Achieve Clean, Deep 0.1 mm Marks on Stainless Steel
- Precision Control: Balancing Power, Speed, and Focus for 0.1 mm Depth
- Sterilization Compatibility: Ensuring Deep Marks Survive Cleaning and Reprocessing
- Workflow Compatibility: Marking Without Compromising Function or Ergonomics
- Recommended System Configurations for Deep Surgical Instrument Marking