


Keywords: medical laser etching defects, etching repair guide, device defect elimination, defect diagnosis, parameter optimization, repair techniques
When Precision Goes Wrong: Identifying Laser Etching Defects
Even the best laser systems produce defects occasionally. Over-ablation, heat discoloration, inconsistent depths, or burr formation can scrap expensive medical components or delay production. Understanding why they happen — and fixing them systematically — separates reliable manufacturers from frustrated ones.
This practical guide walks through common laser etching defects in medical devices, diagnostic steps, and proven repair strategies. Whether you're cutting Nitinol stents, etching PEEK implants, or micro-patterning microfluidics, these techniques apply across GuangYao Laser's PrecisionLase MediCut and MediMark platforms.
The goal: turn rejects into reworkable parts, minimize scrap, and build process stability that prevents recurrence.
Common Defects: Symptoms and Root Causes
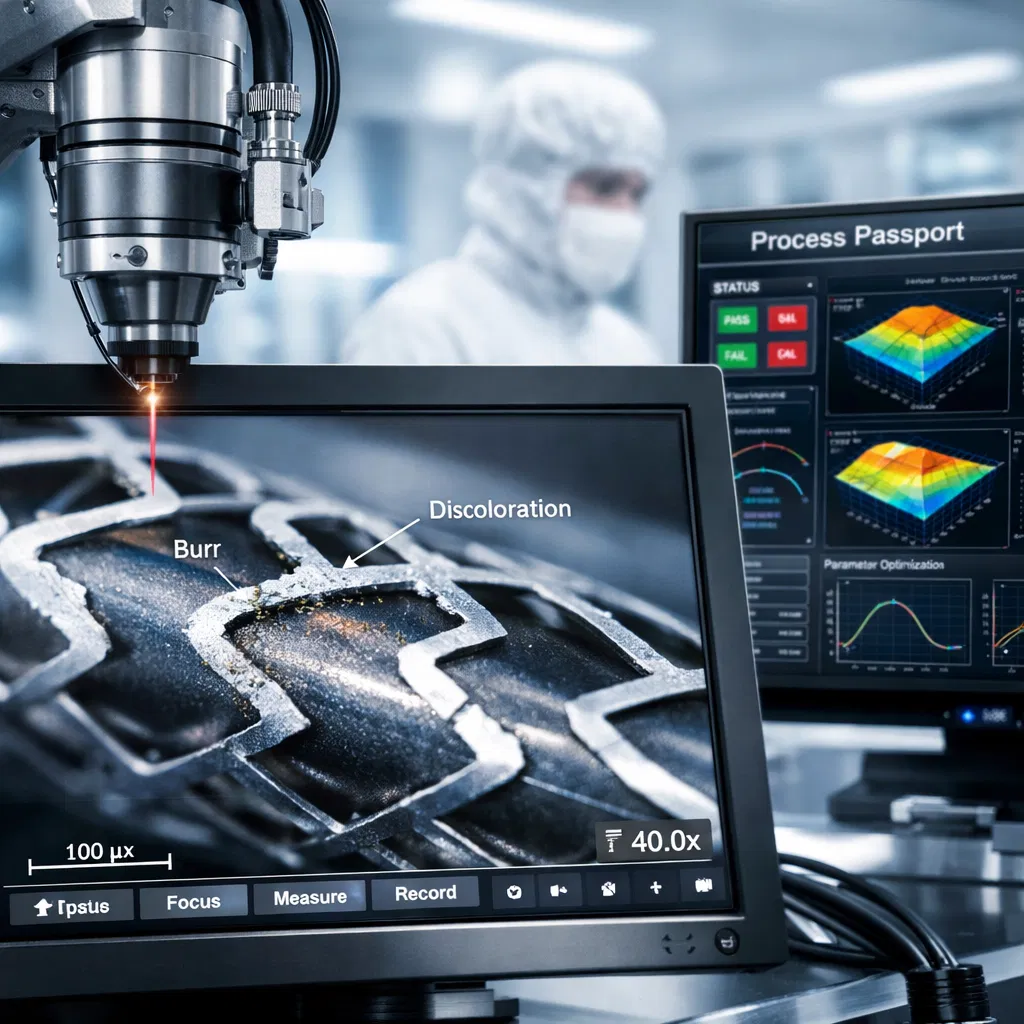
Edge Burrs / Dross
Appearance: Melted droplets along cut edges, especially metals
Root Causes:
Excessive pulse energy → molten expulsion
Insufficient assist gas → plasma shielding
Slow feed rate → overexposure
Heat-Affected Zone (HAZ) Discoloration
Appearance: Yellow/brown bands on titanium, polymers
Root Causes:
Pulse duration >10 ps → thermal conduction
High repetition rate → cumulative heating
Poor gas shielding → oxidation
Inconsistent Depth / Taper
Appearance: Hourglass channels, uneven strut widths
Root Causes:
Focal shift during scan → Z-defocus
Power fluctuation → unstable source
Material variation → inconsistent absorption
Microcracks / Recast Layer
Appearance: Fine fissures visible under 100x mag
Root Causes:
Thermal shock → rapid cool/heat cycles
Pulse overlap >50% → stress concentration
Dirty optics → beam mode degradation
Incomplete Etching / Under-Cut
Appearance: Partial material removal, rough bottoms
Root Causes:
Fluence below ablation threshold
Beam clipping → spot truncation
Substrate contamination → absorption loss
Diagnostic Workflow: Find the Problem Fast
Step 1: Visual + Magnification (10-50x)
Burrs? Check gas pressure and pulse energy
Discoloration? Verify pulse width and shielding
Taper? Inspect focus tracking
Step 2: Profilometry / Cross-Section
Measure HAZ depth (<5 µm target for medical)
Check taper angle (5-15° acceptable)
Confirm depth uniformity (±10% tolerance)
Step 3: Process Data Review
GuangYao PrecisionLase Diagnostic Checklist:
Laser power stability (±2% over run)
Gas flow verification (2-5 L/min)
Z-axis feedback log (focus drift <2 µm)
Environmental data (temp ±2°C, RH 40-60%)
Motion encoder error (<1 encoder count)
Step 4: Material Cross-Check
Verify batch hardness/absorptivity
Confirm surface cleanliness (no oils/fingerprints)
Repair Techniques: Fix vs. Scrap Decision Matrix
Defect Type Repair Method Success Rate Time Impact Cosmetic Result
Light Burrs Air abrasive + ultrasonic 90% +2 min Excellent
Heavy Dross Electropolish (5-10% removal) 85% +15 min Very Good
HAZ Discoloration Chemical etch (Kroll's) 75% +8 min Good
Depth Inconsistency Re-etch with offset path 95% +3 min Perfect
Microcracks Stress relief anneal 60% +30 min Fair
Surface Carbon O₂ plasma clean 98% +5 min Perfect
Pro Tip: Always validate repair efficacy with profilometry before release.
Specific Repair Protocols
Protocol 1: Metal Burr Removal (Nitinol/Titanium)
Equipment: 30 psi glass bead blaster + 40kHz ultrasonic
Blast 10-15 sec at 10 cm standoff
Ultrasonic in 1% Citranox, 45°C (3 min)
DI rinse + IPA dry
Electropolish: 5% H2SO4, 1V, 30 sec
Validation: SEM edge inspection
Protocol 2: Polymer HAZ Repair (PEEK/PLGA)
O2 plasma: 200W, 30 sec (removes carbon)
Chromic acid etch: 2 min at 60°C
Neutralize: 5% NaOH, 30 sec
Rinse dry, profilometry check (Ra<0.8 µm)
Protocol 3: Depth Correction (Microfluidics)
Align part with fiducials
Offset original path by 50% depth
Reduced fluence (70% original)
Single finishing pass at 200 mm/s
Validation: Flow test with dyed water
GuangYao Laser Tip: Store repair recipes in system memory alongside original process — enables one-click rework.
Parameter Optimization: Prevent Recurrence
Burr Prevention Matrix:
High Energy + Low Gas = Heavy Dross → Reduce fluence 20%, increase N2 to 4 L/min
Low Energy + High Gas = Under-cut → Increase fluence 15%, check nozzle alignment
HAZ Elimination:
Switch to 200 fs pulses (vs. 10 ps)
Reduce overlap from 40% to 25%
Add cryogenic assist (-20°C N2)
Stability Checklist:
Clean optics weekly (power drop >5% = dirty)
Calibrate Z-axis monthly (<2 µm backlash)
Verify galvo linearity quarterly (0.1% max error)
Advanced Diagnostics: When Simple Fixes Fail
Inline Monitoring Systems:
Acoustic Emission: Detects plasma anomalies real-time
LIBS Spectroscopy: Flags chemistry changes
Machine Vision: Kerf width variation >3 µm triggers hold
GuangYao PrecisionLase Features:
Process passport: Logs 100+ parameters per part
AI anomaly detection: Flags 8/10 defects before visual inspection
Virtual twin: Simulates fixes before physical rework
When to Scrap:
Crack depth >20% wall thickness
Geometry deviation >50 µm
Surface contamination not removable by plasma
Recurrence after 2 repair attempts
Case Study: Stent Batch Recovery
Problem: 1,200 Nitinol stents with 3-5 µm burrs from gas regulator failure.
Diagnosis: Profilometry confirmed burr height; gas log showed 0.8 L/min vs. spec 3.0.
Repair: Air abrasive + electropolish, 4 min/part.
Results: 98% recovery rate, passed fatigue testing, shipped on-time.
Prevention: Gas interlock added (halts below 2.5 L/min).
Cost Savings: $18,000 material value recovered vs. full scrap.
Cleanroom Rework Protocols
ISO 7/8 Requirements:
Dedicated repair station with laminar flow
Single-use abrasive media per batch
Etchant baths changed every 50 parts
Full traceability (before/after data)
Operator gowning + double-gloving
Validation Chain:
Visual OK → profilometry
Surface OK → contact angle test
Geometry OK → functional test (flow, fatigue)
Release → certificate of conformance
Frequently Asked Questions
Q: Can repaired parts meet ISO 13485 requirements?
Yes, with full documentation. Track repair method, validation data, and functional testing in batch record.
Q: What's the most common laser defect you've seen?
Burrs from gas flow issues — 60% of cases. Simple fix, huge impact.
Q: When is electropolishing preferred over mechanical rework?
For fatigue-critical parts (stents, fracture fixation). Removes 5-10 µm uniformly without stress risers.
Q: How do you handle mixed-material defects?
Protocol varies by material priority. Polymers first (sensitive), then metals. Never mix etchants.
Building Defect-Free Processes
Defects don't define quality — response time and prevention systems do. Implement:
Daily process qualification (5 coupon parts)
Operator cross-training on diagnostics
Weekly optics/gas maintenance
Monthly process capability studies (CpK >1.33)
GuangYao Laser's PrecisionLase platforms embed these disciplines: self-diagnostics, repair guidance, and zero-defect analytics. When etching defects become rare events handled in minutes, production transforms from reactive firefighting to proactive precision.
Your medical devices deserve edges that perform first time, every time — this guide makes that standard operating procedure.
